S3 Bucket
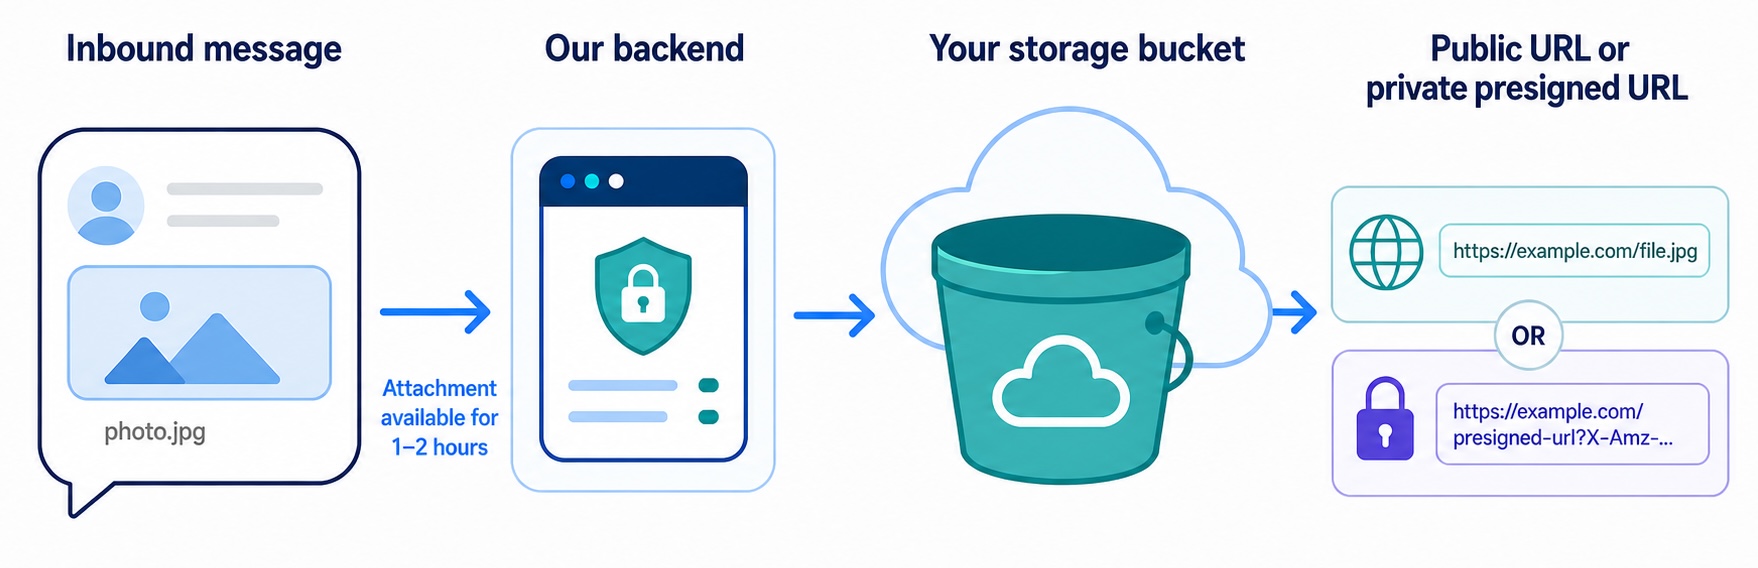
LoopMessage keeps attachments from inbound messages for only about 1 hour. Connect an S3-compatible storage provider to keep these files in your own bucket for as long as you need. This also gives you more control over privacy because the files are automatically uploaded to storage that you manage. Supported providers include Amazon S3, DigitalOcean Spaces, Cloudflare R2, and other services that support the S3 API.
After a successful upload, LoopMessage replaces the original attachment URL with a URL for the stored file. You can use a public URL or a temporary private presigned URL.
This integration stores attachments only from inbound messages. For outbound sendings, your backend should pre-upload attachments to your storage, make URLs publicly accessible and downloadable, and send them in the POST request.
Before you begin
You will need:
- An existing bucket or Space;
- An access key and secret access key with permission to upload objects;
- The bucket’s region;
- The provider’s S3-compatible endpoint URL.
For security, create a dedicated access key for LoopMessage and limit it to the bucket and folder used for attachments. Do not use your account’s root credentials.
How to connect
Step 1: Select your organization
Sign in to Dashboard and select the organization where you want to enable attachment storage.
Step 2: Open Integrations
Open Integrations from the left sidebar and find AWS S3 Storage.
Step 3: Enter your storage settings
Click Connect and complete the following fields:
| Field | What to enter |
|---|---|
| Access Key | The access key ID created for your storage provider. |
| Secret Access Key | The secret key paired with the access key. Keep it private. |
| Bucket ID | The exact name of your bucket or Space. |
| Region | The bucket’s region, such as us-east-1, nyc3, or auto. |
| Bucket endpoint URL | The provider’s S3 API endpoint, including https://. |
| Make URLs public accessible | Enable this only when objects should be publicly readable. Disable it to use temporary presigned URLs. |
| Folder name | The top-level folder for uploaded files. The default is loop-message. |
The folder name may contain lowercase letters, numbers, and hyphens. Our service creates the required path automatically; you do not need to create the folder first.
When you submit the form, we’ll uploads a small test object to:
<folder-name>/<organization-id>/loop-message-creds-test.txtIf the test succeeds, the object is deleted and the integration is saved for the selected organization.
Configure Amazon S3
1. Create an IAM policy
Create a dedicated IAM user or access role for LoopMessage. The following policy is a starting point for a bucket where loop-message is the attachment folder. Replace YOUR_BUCKET with your bucket name.
{
  "Version": "2012-10-17",
  "Statement": [
    {
      "Sid": "LoopMessageObjectAccess",
      "Effect": "Allow",
      "Action": [
        "s3:PutObject",
        "s3:GetObject",
        "s3:DeleteObject",
        "s3:PutObjectAcl",
        "s3:AbortMultipartUpload",
        "s3:ListMultipartUploadParts"
      ],
      "Resource": "arn:aws:s3:::YOUR_BUCKET/loop-message/*"
    },
    {
      "Sid": "LoopMessageMultipartUploads",
      "Effect": "Allow",
      "Action": "s3:ListBucketMultipartUploads",
      "Resource": "arn:aws:s3:::YOUR_BUCKET"
    }
  ]
}
s3:PutObject is used to upload files. s3:GetObject is used when LoopMessage creates a presigned download URL. s3:DeleteObject is used to remove the connection-test object. The multipart permissions allow larger attachments to be uploaded reliably.
If you use a different folder name, change loop-message in the policy to that folder. You do not need to grant s3:ListBucket, s3:GetBucketLocation, or permissions to access the entire bucket.
If you keep Make URLs public accessible checkbox disabled, s3:PutObject, s3:GetObject, and s3:DeleteObject are the object permissions used by the integration. s3:PutObjectAcl is needed only because the public-URL option sends ACL: public-read. The multipart permissions are recommended because boto3 may use multipart upload for larger files.
2. Create access keys
In AWS IAM, create an access key for the dedicated user and copy the access key ID and secret access key. The secret key is shown only when it is created.
3. Enter the S3 settings in LoopMessage
Use values similar to these:
Bucket ID:           my-loopmessage-files
Region:              us-east-1
Bucket endpoint URL: https://s3.us-east-1.amazonaws.com
Folder name:         loop-message
Public accessible URLs
For private storage, leave Make URLs public accessible checkbox disabled. For public storage, enable it and configure a bucket policy that permits s3:GetObject for the attachment prefix. If your bucket uses Bucket owner enforced object ownership, ACLs are disabled; the current public-URL option may fail because it sends public-read. In that case, use private presigned URLs or update the integration to omit the ACL and rely on a bucket policy.
By default we’ll generate a seven-day presigned URL for each uploaded attachment. Grant the token object read and write permissions for the bucket; no bucket-list permission is required. The R2 S3 API endpoint is intended for API access and is not automatically a public website URL.
Configure DigitalOcean Spaces
1. Create a Space
In the DigitalOcean control panel, create a Space in the region where you want to store attachments. Note the Space name and region.
2. Create Spaces access keys
Open API → Spaces Keys in DigitalOcean and create a key. Give it access only to the required Space when DigitalOcean offers that option. Copy both the key and the secret.
3. Enter the Spaces settings in Dashboard
For a Space in New York 3, the values look like this:
Bucket ID:           my-loopmessage-files
Region:              nyc3
Bucket endpoint URL: https://nyc3.digitaloceanspaces.com
Folder name:         loop-message
Replace nyc3 with your Space’s actual region, such as ams3, fra1, sgp1, or sfo3.
Public accessible URLs
If you enable public URLs, make the Space or the attachment folder publicly readable in DigitalOcean and verify that the generated object URL is accessible. Otherwise, keep public URLs disabled so we’ll returns temporary presigned URLs. The Spaces key must be allowed to write objects and, when public URLs are enabled, set the object ACL used by the integration.
Configure Cloudflare R2
1. Create an R2 bucket
In Cloudflare, open R2 Object Storage and create a bucket. Copy your Cloudflare account ID from the R2 overview or the Cloudflare dashboard URL.
2. Create an R2 API token
Create an R2 API token with permission to read and write objects in the selected bucket. Cloudflare provides an access key ID and secret access key for the token. Use those values in LoopMessage; they are not your regular Cloudflare login credentials.
3. Enter the R2 settings in Dashboard
Use the S3-compatible endpoint for your account:
Bucket ID:           my-loopmessage-files
Region:              auto
Bucket endpoint URL: https://<ACCOUNT_ID>.r2.cloudflarestorage.com
Folder name:         loop-message
Replace <ACCOUNT_ID> with your Cloudflare account ID.
Public accessible URLs
For Cloudflare R2, we recommend leaving Make URLs public accessible checkbox disabled. R2 does not support the S3 ACL: public-read option. Do not rely on object ACLs for R2: current R2 buckets use bucket-level public access instead. If this option is enabled with R2, uploads may fail because the integration sends x-amz-acl: public-read.
If you need permanent public URLs, configure public access in Cloudflare first:
- Open Cloudflare Dashboard → R2 Object Storage → select your bucket.
- Open the bucket’s Settings tab.
- Under Public access, either connect a Custom Domain or enable Public Development URL (
r2.dev). Confirm the public-access prompt when Cloudflare asks you to typeallow. - Use the resulting public bucket URL for serving objects. A custom domain is recommended for production;
r2.devis intended for development and is rate-limited.
The current integration does not have a separate field for an R2 public/custom-domain URL and builds public URLs from the S3 API endpoint. The reliable R2 configuration is to leave Make URLs public accessible checkbox disabled.
How attachment storage works
File storage is handled for inbound messages that contain attachments:
- Our service downloads the attachment from its original message URL.
- It uploads the file to the configured bucket using the original content type when available.
- Files are stored using this key format:
<folder-name>/<organization-id>/<file-name>. - Our service updates the message so its attachment URL points to the new object.
If Make URLs public accessible checkbox is enabled, the resulting URL is a direct public URL. If it is disabled, the resulting URL is a presigned GET URL that expires after seven days. The file remains in your bucket after the URL expires and a new URL can be generated only by processing the attachment again.
The integration does not upload outbound-message attachments, and it does not delete stored attachments when a message is deleted.
Troubleshooting
The connection test fails
Check the bucket name, region, endpoint URL, and access keys. Confirm that the credentials can upload to the configured folder. The endpoint must be the provider’s S3 API endpoint, not a dashboard URL or a custom public website URL.
Files upload but public URLs do not open
The bucket or object prefix is not publicly readable, or the provider does not expose public objects through the configured endpoint. Either configure public read access correctly or disable public URLs and use presigned URLs.
Cloudflare R2 returns an access error
Make sure the R2 token includes object read and write access for the selected bucket, use auto as the region, and use the account-specific R2 endpoint. Do not use the Cloudflare dashboard URL.
Large files fail during upload
Verify that the credentials include the multipart-upload permissions listed in the AWS policy above. For S3-compatible providers, also confirm that multipart uploads are enabled for the bucket.
Security recommendations
- Use a dedicated, least-privilege key for each organization or bucket.
- Restrict object permissions to the attachment folder whenever possible.
- Keep buckets private unless public access is a deliberate requirement.
- Prefer presigned URLs for sensitive attachments.
- Rotate the access key if it is exposed or no longer needed.